
Microsoft Azure AD Integration
Learn how to set up Microsoft Azure AD (Entra ID) authentication and user synchronization with Kubiya.
Microsoft Azure AD Integration
This guide will walk you through setting up Microsoft Azure AD (now called Microsoft Entra ID) integration with Kubiya. This integration provides:
- Authentication using your company's Azure AD credentials
- Automatic user synchronization between Azure AD and Kubiya
Enable Azure AD Login
Access Microsoft Entra ID admin page
- Visit the Microsoft Entra ID admin page at https://entra.microsoft.com/
- Navigate to Applications → Enterprise applications → New application
- Click on Create your own application
- Give your application a name (e.g., "Kubiya")
- Click Create at the bottom


Configure application access
- Navigate to Applications → Enterprise applications and click on the application you created in the previous step
- Visit the Overview page and copy the Application ID (you'll need this later)
- Navigate to User and groups on the side menu and click on Add user/group
- Choose the group of users that you would like to sync into the Kubiya Platform (if you don't have one yet, you can create a new security group and add members)


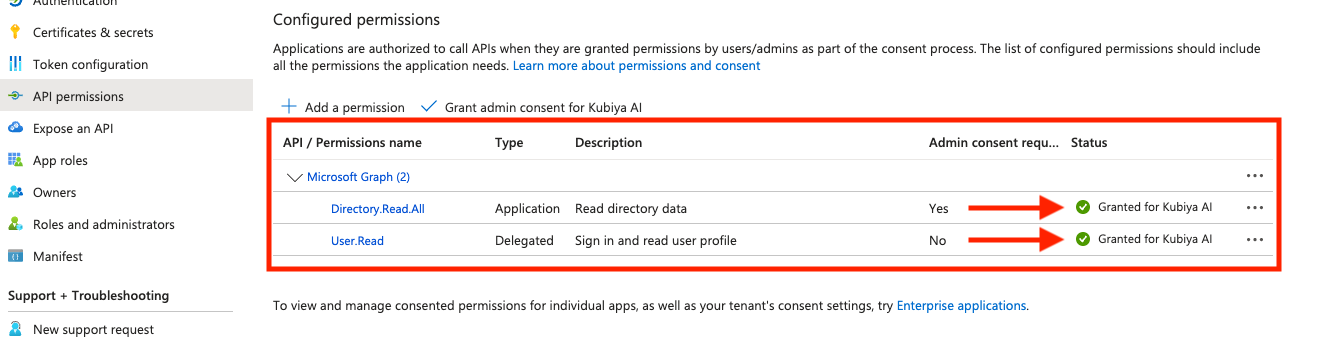
Configure API permissions
- Visit Applications → App registrations and select the app that was just created
- On the side menu, click on API permissions and click on Add permission
- In the popup window, choose Microsoft Graph
- First select Delegated permissions, search for User.Read, mark it, and click on Add permissions
- Click again on Add permission, choose Microsoft Graph, then select Application permissions, search for Directory.Read.All, mark it, and click Add permissions
- On the API permissions page, click on Grant admin consent for...
Create client secret
- From the side menu, click on Certificates & secrets → Client secrets and click New client secret
- Fill out the form with a description and expiration period
- Click Add
- Important: Save the secret value immediately, as you won't be able to see it again

Values needed for Kubiya configuration
You will need the following values to configure Azure AD integration in Kubiya:
- Tenant name and domain - from the "Overview" page
- Application ID - from the "Overview" page
- Secret value - from the "Certificates & secrets" → "Client secrets" page (the value you saved earlier)

Enable Users Auto Sync
The Kubiya support team will provide you with a Token and SCIM URL for this section.
Configure provisioning
- Visit Applications → Enterprise applications and select the app that you created in the previous section
- Navigate to Provisioning
- On the Provisioning page, click on New configuration
- Fill in the form with the values provided by the Kubiya team
- Click Test Connection and then Create

Configure attribute mappings
- Go to Mappings and select Provision Microsoft Entra ID Users
- Go to Attribute Mappings and edit the attributes values:
- externalId
- emails[type eq "work"].value and mail


After completing these steps, your Azure AD integration with Kubiya should be fully configured. Users from the specified Azure AD groups will be automatically provisioned in Kubiya, and they'll be able to log in using their Microsoft credentials.
If you encounter any issues during the setup process, please contact the Kubiya support team for assistance.