> ## Documentation Index
> Fetch the complete documentation index at: https://docs.kubiya.ai/llms.txt
> Use this file to discover all available pages before exploring further.
# Connect Jira
> Connect Jira Cloud via OAuth so agents can create, update, and read issues. Configure site URL, authorize access, and manage or reauthorize the connection securely with least‑privilege scopes.
The **Jira Integration** allows Kubiya to securely access Jira Cloud for managing, tracking, and automating project or issue workflows. This connection enables agents to create, update, and retrieve Jira issues during task execution.
## **1. Open Add Platform Integration**
1. In **Integrations**, scroll to **Platform Integrations**.
2. Click **Add Credential**, then select **Jira** from the list of supported services.
3. You’ll be redirected to the **Add Platform Integration** setup page for Jira.
## **2. Configure Jira Integration**
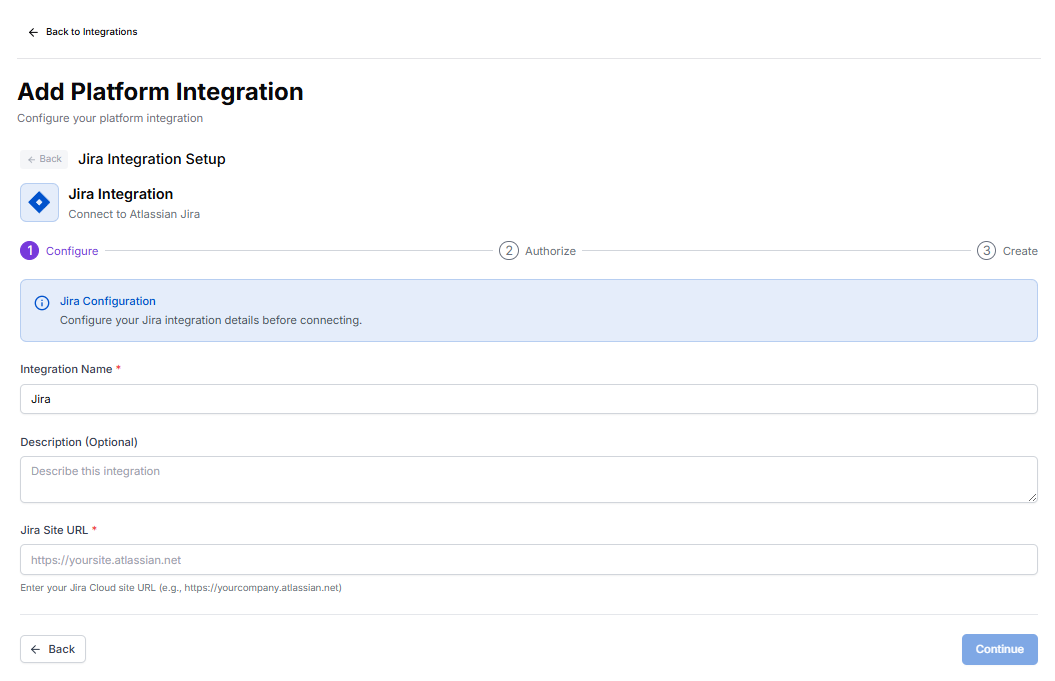 In the first step, configure your Jira connection details.
**Fields**
* **Integration Name**\* – Assign a name to identify this Jira connection (e.g., `Jira-Prod`, `Team-Jira`, `Internal-Projects`).
* **Description** *(Optional)* – Add a short note about what this integration will be used for (e.g., *used by engineering automation workflows*).
* **Jira Site URL**\* – Enter the base URL of your Jira Cloud site.
Format: `https://yourcompany.atlassian.net`
**Note:** Only Jira Cloud sites are supported. Jira Server or Data Center instances require a separate setup using API tokens.
Once the required fields are filled, click **Continue**.
## **3. Authorize Jira**
In the first step, configure your Jira connection details.
**Fields**
* **Integration Name**\* – Assign a name to identify this Jira connection (e.g., `Jira-Prod`, `Team-Jira`, `Internal-Projects`).
* **Description** *(Optional)* – Add a short note about what this integration will be used for (e.g., *used by engineering automation workflows*).
* **Jira Site URL**\* – Enter the base URL of your Jira Cloud site.
Format: `https://yourcompany.atlassian.net`
**Note:** Only Jira Cloud sites are supported. Jira Server or Data Center instances require a separate setup using API tokens.
Once the required fields are filled, click **Continue**.
## **3. Authorize Jira**
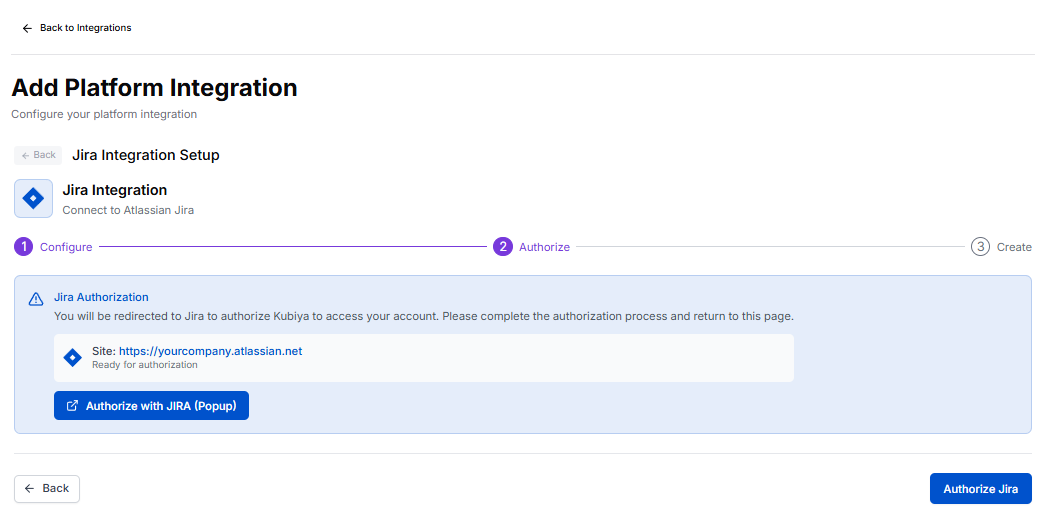 This step connects Kubiya with your Jira Cloud instance via OAuth 2.0 authorization.
1. Verify the displayed site URL under **Jira Authorization** (e.g., `https://yourcompany.atlassian.net`).
2. Click **Authorize with Jira (Popup)** to open Atlassian’s OAuth window.
3. Sign in with your Atlassian account (if prompted).
4. Review the requested permissions and click **Accept** to grant Kubiya access.
* Kubiya requires permission to read and manage issues, projects, and comments within your Jira Cloud workspace.
After successful authorization, you’ll be redirected back to Kubiya with the status shown as “Ready for connection.”
Click **Authorize Jira** to complete this step.
## **4. Create and Finalize Integration**
Once authorization is complete, Kubiya automatically saves the integration with the provided credentials.
On this final step:
* The connection status updates to **Active**.
* You can now view the integration listed under **Platform Integrations**.
* Agents are immediately able to use Jira-related tasks and commands, such as:
* Creating new Jira issues.
* Fetching and updating existing issues.
* Adding comments or changing issue status.
**Note:** If authorization fails or expires, you can reauthorize the connection by selecting the Jira integration and clicking **Reconnect**.
## **5. Managing the Jira Integration**
From **Integrations > Platform Integrations**, you can:
* **View connection details:** See the integration name, connected site, and status.
* **Edit description:** Update notes about the integration’s purpose.
* **Reauthorize:** Reconnect if the token has expired or permissions were changed.
* **Remove Integration:** Safely delete the connection if it’s no longer needed.
## **Required Jira Permissions**
Kubiya uses OAuth 2.0 (3LO) for Jira Cloud. During authorization, the following scopes are requested:
* `read:jira-work` – Read Jira issues and projects.
* `write:jira-work` – Create and update issues.
* `read:jira-user` – View user and assignee information.
* `manage:jira-configuration` – (Optional) Access metadata required for advanced task execution.
All credentials are stored securely following encryption and least-privilege principles.
## **Troubleshooting**
| Issue | Possible Cause | Resolution |
| ------------------------------------ | ---------------------------------- | ------------------------------------------------ |
| **Authorization popup doesn’t open** | Browser blocking popups | Allow popups or try again in an incognito window |
| **Invalid Jira site URL** | URL not in `.atlassian.net` format | Re-enter correct Jira Cloud URL |
| **Authorization denied** | User lacks admin rights | Request a Jira admin to complete the integration |
| **Expired access** | OAuth token expired | Reauthorize via the integration settings |
## **Security Notes**
* Only authorized workspace admins can add or delete Jira integrations.
* OAuth tokens are stored using Kubiya’s encrypted credential management system.
* Permissions requested from Jira are limited to the scopes required for automation and issue management.
This step connects Kubiya with your Jira Cloud instance via OAuth 2.0 authorization.
1. Verify the displayed site URL under **Jira Authorization** (e.g., `https://yourcompany.atlassian.net`).
2. Click **Authorize with Jira (Popup)** to open Atlassian’s OAuth window.
3. Sign in with your Atlassian account (if prompted).
4. Review the requested permissions and click **Accept** to grant Kubiya access.
* Kubiya requires permission to read and manage issues, projects, and comments within your Jira Cloud workspace.
After successful authorization, you’ll be redirected back to Kubiya with the status shown as “Ready for connection.”
Click **Authorize Jira** to complete this step.
## **4. Create and Finalize Integration**
Once authorization is complete, Kubiya automatically saves the integration with the provided credentials.
On this final step:
* The connection status updates to **Active**.
* You can now view the integration listed under **Platform Integrations**.
* Agents are immediately able to use Jira-related tasks and commands, such as:
* Creating new Jira issues.
* Fetching and updating existing issues.
* Adding comments or changing issue status.
**Note:** If authorization fails or expires, you can reauthorize the connection by selecting the Jira integration and clicking **Reconnect**.
## **5. Managing the Jira Integration**
From **Integrations > Platform Integrations**, you can:
* **View connection details:** See the integration name, connected site, and status.
* **Edit description:** Update notes about the integration’s purpose.
* **Reauthorize:** Reconnect if the token has expired or permissions were changed.
* **Remove Integration:** Safely delete the connection if it’s no longer needed.
## **Required Jira Permissions**
Kubiya uses OAuth 2.0 (3LO) for Jira Cloud. During authorization, the following scopes are requested:
* `read:jira-work` – Read Jira issues and projects.
* `write:jira-work` – Create and update issues.
* `read:jira-user` – View user and assignee information.
* `manage:jira-configuration` – (Optional) Access metadata required for advanced task execution.
All credentials are stored securely following encryption and least-privilege principles.
## **Troubleshooting**
| Issue | Possible Cause | Resolution |
| ------------------------------------ | ---------------------------------- | ------------------------------------------------ |
| **Authorization popup doesn’t open** | Browser blocking popups | Allow popups or try again in an incognito window |
| **Invalid Jira site URL** | URL not in `.atlassian.net` format | Re-enter correct Jira Cloud URL |
| **Authorization denied** | User lacks admin rights | Request a Jira admin to complete the integration |
| **Expired access** | OAuth token expired | Reauthorize via the integration settings |
## **Security Notes**
* Only authorized workspace admins can add or delete Jira integrations.
* OAuth tokens are stored using Kubiya’s encrypted credential management system.
* Permissions requested from Jira are limited to the scopes required for automation and issue management.