> ## Documentation Index
> Fetch the complete documentation index at: https://docs.kubiya.ai/llms.txt
> Use this file to discover all available pages before exploring further.
# Connect GitHub
> Connect GitHub via OAuth (App) to trigger workflows and let Kubiya act on repositories. Install the app, choose repos, and manage least‑privilege access for secure, auditable automation.
Use the GitHub (App) integration to enable workflow triggers (webhooks/OAuth) from GitHub and let Kubiya act on repositories (PRs, pushes, issues, etc.).
## **1) Open Integrations > Add Workflow Integration**
1. In the Kubiya UI, go to **Integrations**.
2. Under **Workflow Triggers** click **Add Trigger** or **Browse Integrations**.
3. Select **GitHub (App)** from the list.
## **2) Create a named connection**
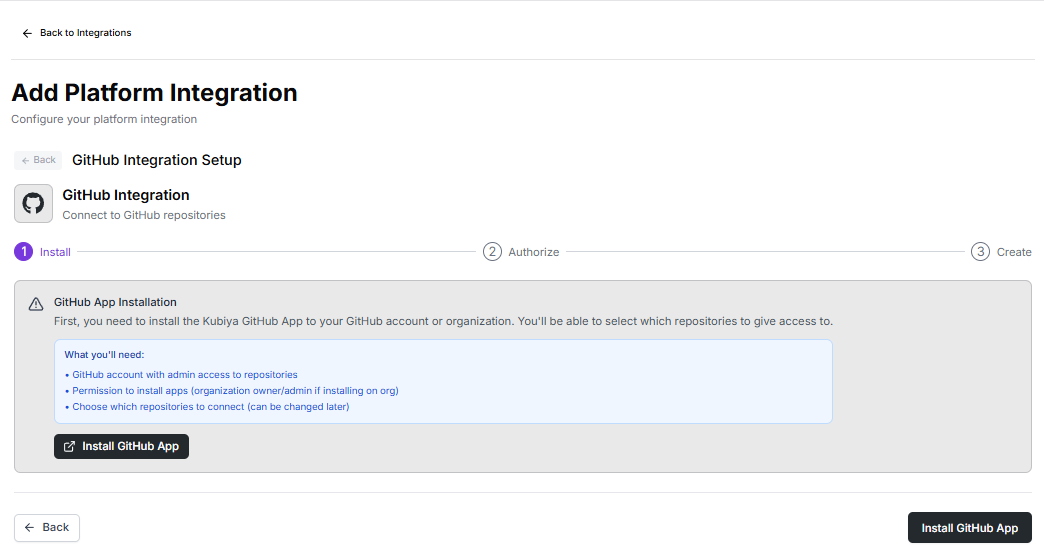 1. A small dialog appears asking for a **Connection Name** (e.g., `Production`, `staging`, `team-x`).
2. Enter a descriptive name and click **Continue to OAuth** (or **Continue**).
The connection name helps you identify which GitHub account or org is linked in the future.
## **3) Authenticate and install the GitHub App (OAuth flow)**
1. A small dialog appears asking for a **Connection Name** (e.g., `Production`, `staging`, `team-x`).
2. Enter a descriptive name and click **Continue to OAuth** (or **Continue**).
The connection name helps you identify which GitHub account or org is linked in the future.
## **3) Authenticate and install the GitHub App (OAuth flow)**
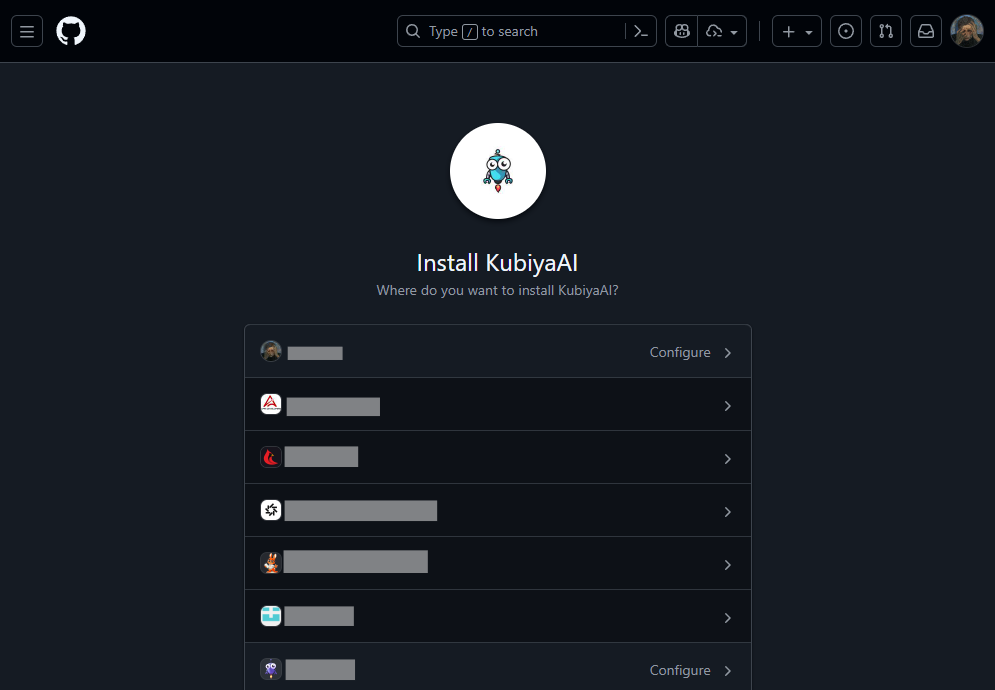 1. You’ll be redirected to GitHub’s install dialog (the “Link GitHub (App) Account” page).
2. Choose where to install the Kubiya/GitHub app:
* Select your user account or an organization.
3. Click **Configure** (or **Install**) and grant the requested permissions.
## **4) Choose repository access**
1. On GitHub choose **All repositories** (recommended for broad triggering) **or** **Only select repositories** (recommended for least privilege).
2. Click **Save / Install** to complete the install.
## **5) Confirm connection in Kubiya**
1. After successful install you’ll be returned to Kubiya. The new connection appears under **GitHub (App)** with the name you provided.
2. The connection card shows status (Active/Connected) and the connection date. You can **Add Connection** again to create more named connections.
## **6) Use the connection as a workflow trigger**
1. When creating or editing a workflow you can pick the GitHub trigger and select the connection you installed.
2. Events such as PR opened, push, issue created will now be able to trigger workflows via the installed GitHub App.
## **Manage a connection**
* From **Integrations > GitHub (App)** open the connection card to view details (status, connection name, created date).
* Use **Add Connection** to create additional connections (e.g., separate orgs, staging vs production).
## **Permissions & what Kubiya needs**
Kubiya’s GitHub App typically needs:
* Read access to repository metadata (name, branches, PRs).
* Webhook creation permission (so events will be sent).
* Read (and optionally write) access to contents if workflows need to check out or modify files / create statuses.
* (If you grant “All repositories” access the app sees all repos in the account/org, prefer “select repos” for least privilege.)
If you use the **App** to trigger workflows only, you can limit write scopes. If agents need to commit or push, grant necessary repo write scopes.
## **Quick troubleshooting**
* **Install not visible**: Make sure you selected the correct GitHub organization or user during the install step. Re-run **Add Connection** and check GitHub permissions.
* **Triggers don’t fire**: Confirm the workflow trigger is configured to use that connection and that webhooks are enabled in the app install page on GitHub.
* **Permission denied / insufficient scope**: Revisit GitHub’s app settings and add the required repository or organization permissions.
* **Redirect/OAuth blocked**: Ensure your browser allows the OAuth popup and redirects. If your org blocks third-party app installs, ask your GitHub org admin to approve Kubiya’s GitHub App.
* **Multiple connections**: If you have multiple GitHub accounts/orgs, create one connection per account/org and name them clearly (e.g., `github-production`, `github-qa`).
## **Security recommendations**
* Use **select repositories** if you only need triggers for a subset of repos (least privilege).
* Give the app the minimum scopes required by your workflows (start conservative and expand only when needed).
* Track installed connections and remove ones no longer used.
1. You’ll be redirected to GitHub’s install dialog (the “Link GitHub (App) Account” page).
2. Choose where to install the Kubiya/GitHub app:
* Select your user account or an organization.
3. Click **Configure** (or **Install**) and grant the requested permissions.
## **4) Choose repository access**
1. On GitHub choose **All repositories** (recommended for broad triggering) **or** **Only select repositories** (recommended for least privilege).
2. Click **Save / Install** to complete the install.
## **5) Confirm connection in Kubiya**
1. After successful install you’ll be returned to Kubiya. The new connection appears under **GitHub (App)** with the name you provided.
2. The connection card shows status (Active/Connected) and the connection date. You can **Add Connection** again to create more named connections.
## **6) Use the connection as a workflow trigger**
1. When creating or editing a workflow you can pick the GitHub trigger and select the connection you installed.
2. Events such as PR opened, push, issue created will now be able to trigger workflows via the installed GitHub App.
## **Manage a connection**
* From **Integrations > GitHub (App)** open the connection card to view details (status, connection name, created date).
* Use **Add Connection** to create additional connections (e.g., separate orgs, staging vs production).
## **Permissions & what Kubiya needs**
Kubiya’s GitHub App typically needs:
* Read access to repository metadata (name, branches, PRs).
* Webhook creation permission (so events will be sent).
* Read (and optionally write) access to contents if workflows need to check out or modify files / create statuses.
* (If you grant “All repositories” access the app sees all repos in the account/org, prefer “select repos” for least privilege.)
If you use the **App** to trigger workflows only, you can limit write scopes. If agents need to commit or push, grant necessary repo write scopes.
## **Quick troubleshooting**
* **Install not visible**: Make sure you selected the correct GitHub organization or user during the install step. Re-run **Add Connection** and check GitHub permissions.
* **Triggers don’t fire**: Confirm the workflow trigger is configured to use that connection and that webhooks are enabled in the app install page on GitHub.
* **Permission denied / insufficient scope**: Revisit GitHub’s app settings and add the required repository or organization permissions.
* **Redirect/OAuth blocked**: Ensure your browser allows the OAuth popup and redirects. If your org blocks third-party app installs, ask your GitHub org admin to approve Kubiya’s GitHub App.
* **Multiple connections**: If you have multiple GitHub accounts/orgs, create one connection per account/org and name them clearly (e.g., `github-production`, `github-qa`).
## **Security recommendations**
* Use **select repositories** if you only need triggers for a subset of repos (least privilege).
* Give the app the minimum scopes required by your workflows (start conservative and expand only when needed).
* Track installed connections and remove ones no longer used.