> ## Documentation Index
> Fetch the complete documentation index at: https://docs.kubiya.ai/llms.txt
> Use this file to discover all available pages before exploring further.
# Task Queues
> Durable task distribution system that routes agent workloads to available workers. Scale throughput, isolate environments, and reach private resources securely.
Task Queues are durable distribution systems that route agent tasks to available workers. Queues hold work; workers (machines running the Kubiya worker process) connect to queues and pull tasks to execute. Use Kubiya Cloud queues to start quickly, then create custom queues when you need to scale execution across your own infrastructure, isolate workloads, or reach private network resources.
 ## **When to use**
* **Scale execution** horizontally across many machines.
* **Isolate workloads** by environment, team, region, or hardware (e.g., GPU vs. CPU).
* **Reach private resources** by attaching self-hosted workers inside your network.
**Task Queues vs Workers:** A task queue is a waiting area for work. Workers are the execution engines that pull from queues and run agent workflows. Learn more about [Workers](/core-concepts/execution-infrastructure/workers).
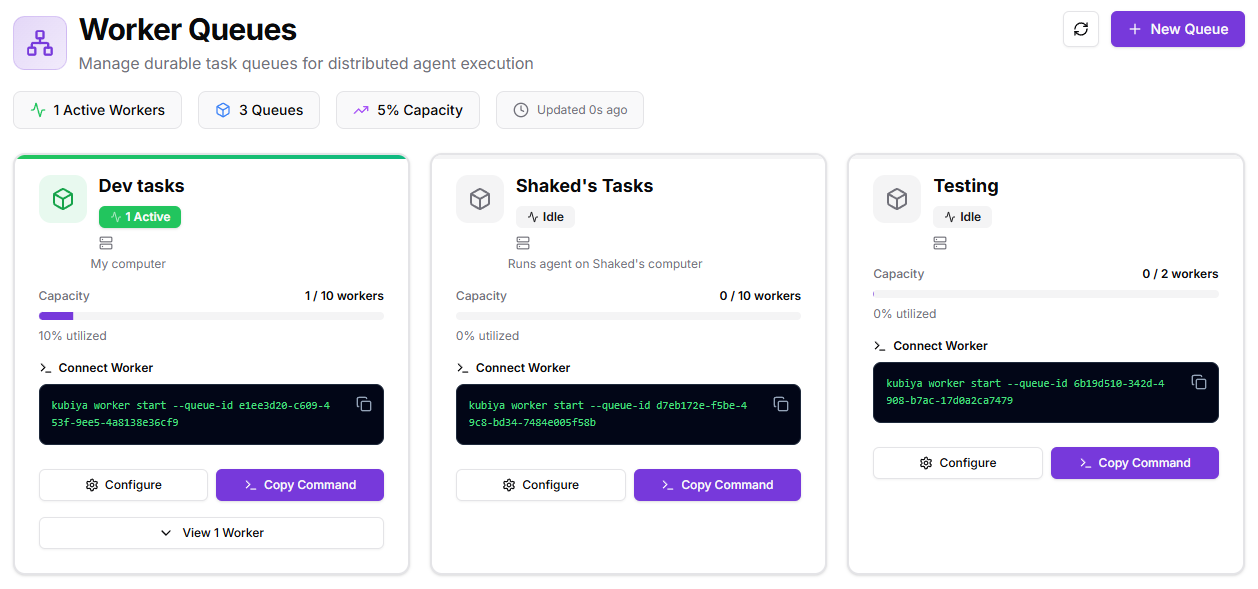
## **What you’ll see in the Dashboard**
* **KPI chips**: Active Workers • Queues • Capacity • Last Updated.
* **Queue cards** (one per queue):
* **Status** (Active/Idle) and a **capacity bar** (e.g., `1 / 10 workers`).
* **Connect Worker** area with a ready-to-copy command.
* **Configure** (edit name/description, control plane, max workers).
* **View workers** attached to this queue.
* **New Queue**: creates another queue and gives you a fresh connection command.
## **How it works**
1. A **Control Plane** defines what capabilities are available (Skills, MCP servers, LLM settings, policies).
2. An **Agent or Team** receives a task to execute.
3. The task is **routed to a Task Queue** based on environment, priority, or explicit routing rules.
4. **Workers** connected to that queue pull the task and begin execution.
5. The worker executes the agent workflow in an **isolated environment** with streaming logs and audit trails.
6. Results stream back to the Control Plane and user.
Multiple workers can attach to the same queue for parallel execution and high availability. A single machine can also attach to **multiple queues** if it has capacity.
## **Selecting queues from Meta Agent**
The [Meta Agent](/core-concepts/meta-agent) provides a convenient way to select task queues directly from the chat interface.
Click the **server icon** in the chat input bar to open the Remote Task Queues selector:
* View all available task queues (e.g., Dev, Production, GPU workers)
* See worker capacity and availability for each queue
* Select a queue to route your task execution to specific infrastructure
This is useful when you need to:
* **Access private resources** — Route tasks to workers inside your VPC or private network
* **Use specialized hardware** — Direct GPU-intensive tasks to queues with GPU workers
* **Target specific environments** — Run tasks on production vs. staging infrastructure
* **Distribute load** — Manually select less-busy queues for urgent tasks
Once selected, the Meta Agent routes all subsequent task executions to the chosen queue until you change the selection or start a new session.
## **Create a new queue**
## **When to use**
* **Scale execution** horizontally across many machines.
* **Isolate workloads** by environment, team, region, or hardware (e.g., GPU vs. CPU).
* **Reach private resources** by attaching self-hosted workers inside your network.
**Task Queues vs Workers:** A task queue is a waiting area for work. Workers are the execution engines that pull from queues and run agent workflows. Learn more about [Workers](/core-concepts/execution-infrastructure/workers).
## **What you’ll see in the Dashboard**
* **KPI chips**: Active Workers • Queues • Capacity • Last Updated.
* **Queue cards** (one per queue):
* **Status** (Active/Idle) and a **capacity bar** (e.g., `1 / 10 workers`).
* **Connect Worker** area with a ready-to-copy command.
* **Configure** (edit name/description, control plane, max workers).
* **View workers** attached to this queue.
* **New Queue**: creates another queue and gives you a fresh connection command.
## **How it works**
1. A **Control Plane** defines what capabilities are available (Skills, MCP servers, LLM settings, policies).
2. An **Agent or Team** receives a task to execute.
3. The task is **routed to a Task Queue** based on environment, priority, or explicit routing rules.
4. **Workers** connected to that queue pull the task and begin execution.
5. The worker executes the agent workflow in an **isolated environment** with streaming logs and audit trails.
6. Results stream back to the Control Plane and user.
Multiple workers can attach to the same queue for parallel execution and high availability. A single machine can also attach to **multiple queues** if it has capacity.
## **Selecting queues from Meta Agent**
The [Meta Agent](/core-concepts/meta-agent) provides a convenient way to select task queues directly from the chat interface.
Click the **server icon** in the chat input bar to open the Remote Task Queues selector:
* View all available task queues (e.g., Dev, Production, GPU workers)
* See worker capacity and availability for each queue
* Select a queue to route your task execution to specific infrastructure
This is useful when you need to:
* **Access private resources** — Route tasks to workers inside your VPC or private network
* **Use specialized hardware** — Direct GPU-intensive tasks to queues with GPU workers
* **Target specific environments** — Run tasks on production vs. staging infrastructure
* **Distribute load** — Manually select less-busy queues for urgent tasks
Once selected, the Meta Agent routes all subsequent task executions to the chosen queue until you change the selection or start a new session.
## **Create a new queue**
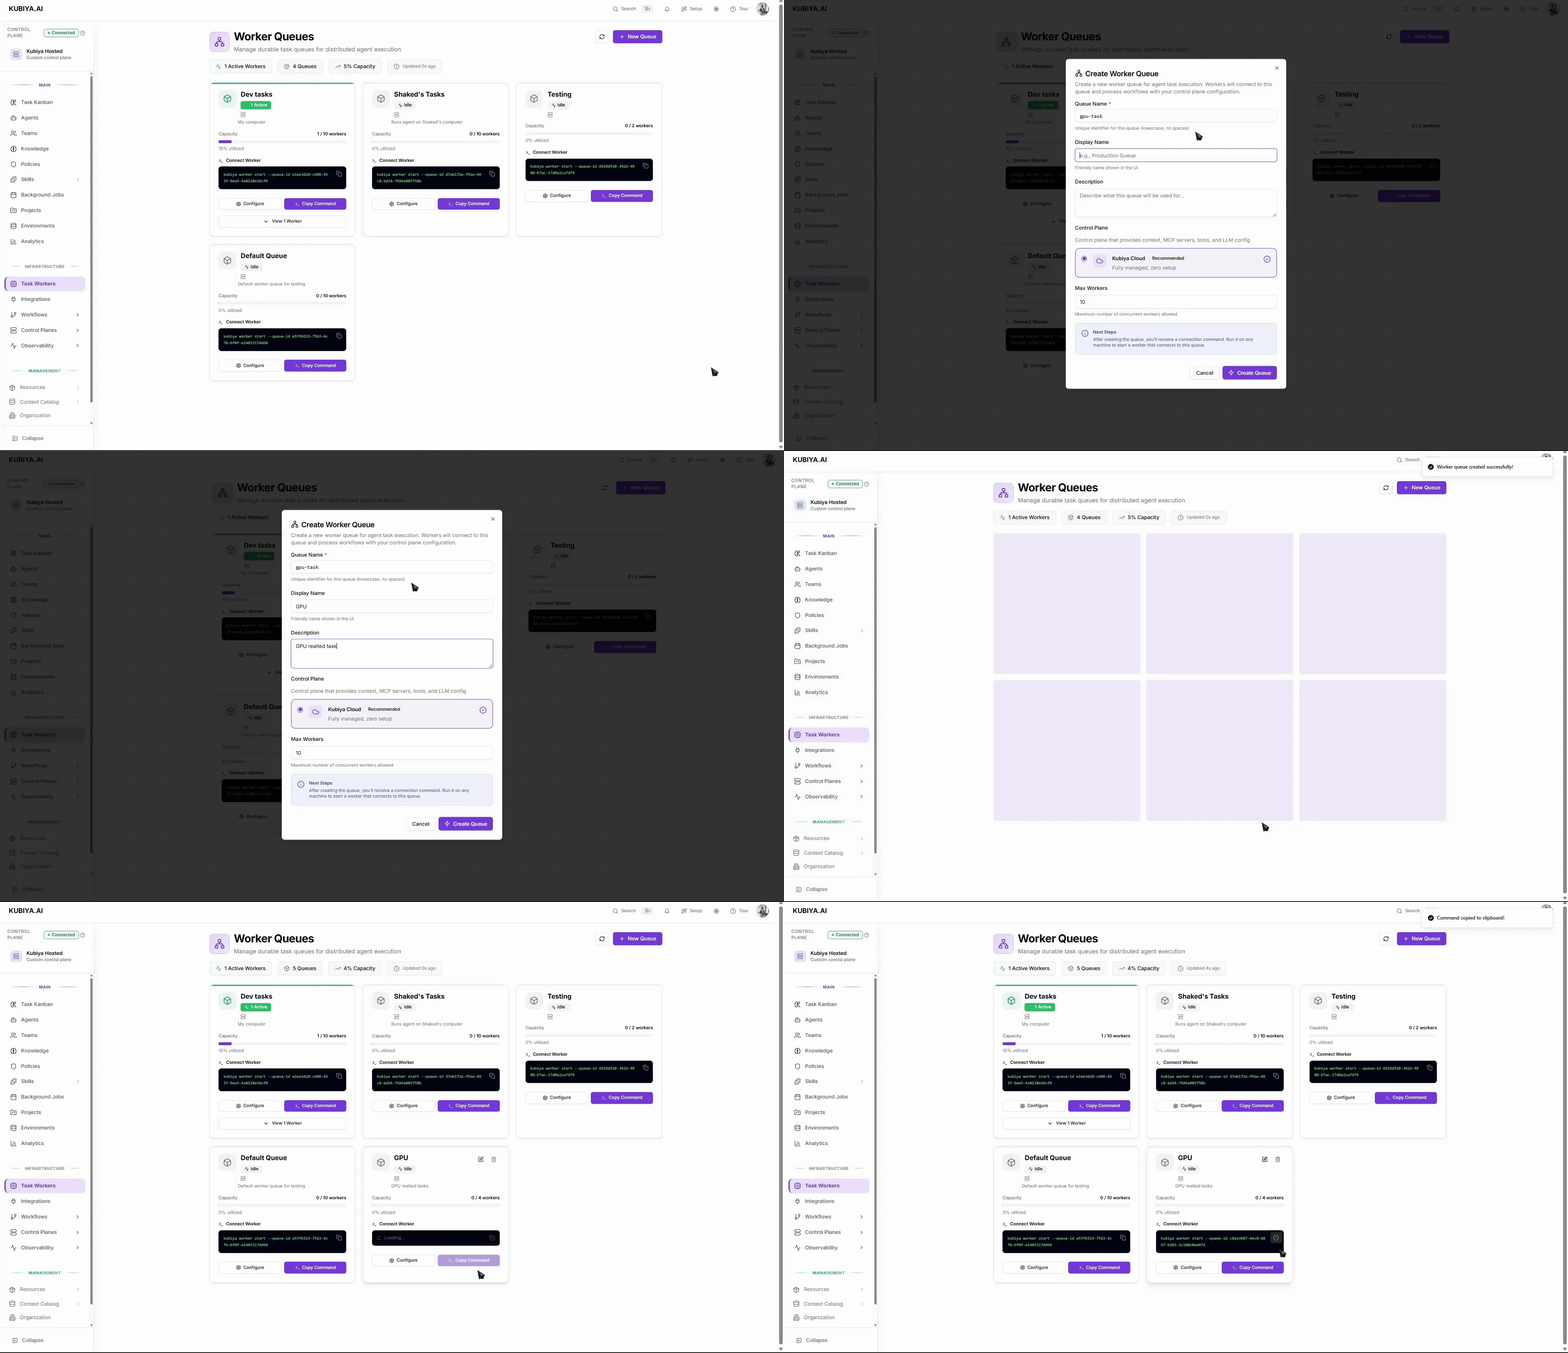 1. Click **New Queue**.
2. Set a **Queue Name** and optional **Display Name/Description**.
Tip: name by purpose, e.g., `staging`, `gpu-tasks`, `prod-eu`.
3. Choose a **Control Plane** (Kubiya Cloud is the default, fully managed option).
4. Set **Max Workers** (the max concurrent worker processes for this queue).
5. Click **Create Queue**. You’ll get a **Connect Worker** command.
## **Add workers to a queue**
Workers are managed through the Kubiya CLI. See the [Workers](/core-concepts/execution-infrastructure/workers) page for a conceptual overview of what workers are and where they can run.
**Requirements:** the target machine has **Python 3** and the **Kubiya CLI** installed.
1. On the queue card, open **Connect Worker** and **copy** the command.
2. Run it on any machine you want to contribute capacity from.
Example format:
`kubiya worker start --queue-id `
3. Repeat on more machines to scale out.
* Each started worker process consumes one **worker slot**.
* The same machine may join **multiple queues** if resources allow.
## **Good defaults & tips**
* Keep **max workers** modest at first; raise as your team’s throughput grows.
* Use **separate queues** for boundaries (prod vs. staging, region, GPU, high-risk tasks).
* Add a clear **description** so teammates know what belongs on the queue.
For worker concepts and lifecycle management, see [Workers](/core-concepts/execution-infrastructure/workers). For technical deployment details and advanced configurations, see [Worker Management CLI](/cli/workers).
## **Security & isolation**
* Steps execute in **containers** with the environment’s configured context, policies, and Skills.
* For self-hosted workers, restrict the host’s access to only what the queue needs.
* Rotate credentials and remove idle workers by stopping the worker process on that host.
## **Troubleshooting**
* **Worker won’t connect**: verify Python 3 + CLI are installed; re-copy the exact command; check outbound network access.
* **Jobs stuck in queue**: ensure at least one **online worker** and that **capacity** isn’t zero.
* **“No capacity” warnings**: increase **Max Workers** or attach more machines.
* **Slow runs**: add more workers or split work across additional queues.
1. Click **New Queue**.
2. Set a **Queue Name** and optional **Display Name/Description**.
Tip: name by purpose, e.g., `staging`, `gpu-tasks`, `prod-eu`.
3. Choose a **Control Plane** (Kubiya Cloud is the default, fully managed option).
4. Set **Max Workers** (the max concurrent worker processes for this queue).
5. Click **Create Queue**. You’ll get a **Connect Worker** command.
## **Add workers to a queue**
Workers are managed through the Kubiya CLI. See the [Workers](/core-concepts/execution-infrastructure/workers) page for a conceptual overview of what workers are and where they can run.
**Requirements:** the target machine has **Python 3** and the **Kubiya CLI** installed.
1. On the queue card, open **Connect Worker** and **copy** the command.
2. Run it on any machine you want to contribute capacity from.
Example format:
`kubiya worker start --queue-id `
3. Repeat on more machines to scale out.
* Each started worker process consumes one **worker slot**.
* The same machine may join **multiple queues** if resources allow.
## **Good defaults & tips**
* Keep **max workers** modest at first; raise as your team’s throughput grows.
* Use **separate queues** for boundaries (prod vs. staging, region, GPU, high-risk tasks).
* Add a clear **description** so teammates know what belongs on the queue.
For worker concepts and lifecycle management, see [Workers](/core-concepts/execution-infrastructure/workers). For technical deployment details and advanced configurations, see [Worker Management CLI](/cli/workers).
## **Security & isolation**
* Steps execute in **containers** with the environment’s configured context, policies, and Skills.
* For self-hosted workers, restrict the host’s access to only what the queue needs.
* Rotate credentials and remove idle workers by stopping the worker process on that host.
## **Troubleshooting**
* **Worker won’t connect**: verify Python 3 + CLI are installed; re-copy the exact command; check outbound network access.
* **Jobs stuck in queue**: ensure at least one **online worker** and that **capacity** isn’t zero.
* **“No capacity” warnings**: increase **Max Workers** or attach more machines.
* **Slow runs**: add more workers or split work across additional queues.